Showing posts with label Crafts. Show all posts

Sunday, March 2, 2014

DIY Pencil Vase

I found this idea somewhere on Pinterest (as usual), and decided to make one for a colleague for her birthday...

1. Start with an emptied and cleaned can, and a box of about 30 unsharpened pencils. Use a hot glue gun to adhere one pencil at a time around the can. Note: mine ended up a little crooked, so if I were to do this again, I'd probably use a level and draw some lines on the can ahead of time to use as a guide.
 
2. Just keep gluing. Just keep gluing. (Finding Nemo, anyone?)

3. And viola! I added a black ribbon, filled the can with water, and arranged some flowers.

Happy Crafting!

Tuesday, January 7, 2014

Fleece Tie Blanket

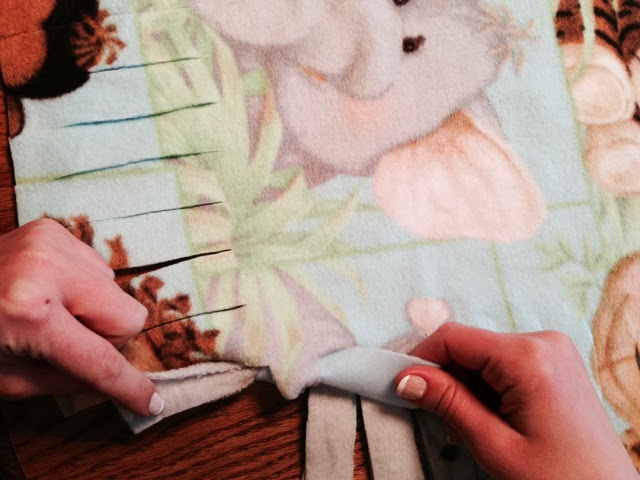
So we've all seen these... They're super easy, no-sew blankets... I FINALLY made one with the help from Jan, my soon-to-be-mother-in-law (STBMIL). She's been cutting and sewing up a storm, making 125 Days for Girls kits (whoa!), and getting much of the flannel donated. In the mix of all the flannel, there was some soft fleece, perfect for a baby blanket. So we decided to make that knotted blanket we've all seen so much...

We followed this tutorial on wikiHow.

1. Cut your top and bottom fleece to the same size.

2. Cut a 4" square from each corner.

3. Cut strips 1" wide and 4" long all the way around your fleece pieces.

4. Tie a knot (2 times to stay securely) with a strip from each layer (top and bottom).

5. Keep tying knots all the way around the blanket.

6. Snuggle up and enjoy!

A huge thanks to Jan for providing all the materials needed for this project, as well as taking the pictures! Such cute and snuggly fun!

Happy Crafting!

Monday, November 11, 2013

Wine Charms

Although our wedding is not until April, I couldn't wait to make these mr and mrs wine charms. Below is a tutorial.

1. Choose your font and print a stencil. I chose to use Carolyna Pro black, my most favoritest of favorite fonts ever. EVER. You could obviously choose a picture here, too.

2. Bend your wire as you trace your stencil. The thicker and sturdier your wire, the more difficult this will be. Use a pair of pliers to help. And don't forget to leave some length on one end for the part that goes around the wine glass (no idea what it's called).


3. Drink! Place your wine charms around your wine glass, pour yourself a drink, and enjoy!

Happy Crafting!

Paper Roses

Another long-time to do list item was finally checked off today. I've had the copies of music ready to use for almost 3 years now!!! Below is my step-by-step tutorial, which I found somewhere on the internet 3 years ago, printed out, and kept... So sorry I can't link to it, but I can't find it. :(

1. Gather some pretty paper. I decided to use some copied sheet music. I was in the teacher's lounge one day almost 3 years ago making copies when the music teacher walked in to do the same. The music he was copying looked "musicy" to me, so I asked if I could have one. Easy peasy.

2. Optional: Stain your sheet music. Pour some hot water into a 9" x 13" pan with a dark brown or black tea (I used a dark brown tea in order to get the soft creamy color, use black tea if you want something darker). Soak your sheet music in the tea for some time. Confession: I have no idea how long I left mine in there for. Maybe an hour or two? It could have been half a day, though. I was doing so many crafts at the same time!

3. Hang to dry. I tied up some string on my neighbor's house, then hung my sheet music using clothes pins. They only needed an hour or so to dry, but mine were in the sun and it's pretty dry out here.

4. Cut spiral flowers. I'm not sure how else to describe what to do here except, cut in a continuously smaller circle until you get to the the middle. I used my scalloped scissors, which created a pretty cool effect.

5. Wrap the spiral cirlcle flowers tightly around a pencil. When you do this, the spiral will naturally want to wind down the pencil. To avoid this, wrap tightly at the inside end of the spiral, keeping the bottom of your flower tight and allowing the top to become looser. This is how you will get a rose look, as opposed to just a tightly wrapped piece of paper. I also used hot glue every once and a while to help it all stay in place.

6. Glue stem. Glue one end of a green wire to the inside of the paper flower (where the pencil was). I created a little loop at the end in order to help the wire stay a little better.

7. Arrange. Cut the wire stems to your desired length and place your paper flowers in a vase. Viola! I put mine on a shelf next to all my Jane Austen books. Yes, I have read them all. And yes, they are all pretty much the same. ;)


Happy Crafting!

Wine Cork Monogram

I've had "make a wine cork monogram letter" on my to do list for quite a long time, so with a 3-day weekend, I finally decided to check it off!

Here is my step-by-step tutorial...

1. Arrange your corks. I chose to do a serif style letter and to randomly turn the corks each direction. You could also print out a font you like and arrange your corks on top. Or even buys wooden letter and glue your corks on top of that.

2. Glue. I used my hot glue gun to glue piece by piece. I found it helpful to line my corks up on the edge of the table (or the edge of anything straight) in order to keep them lined up right.


3. Decorate! I chose to place my wine cork monogram letter on a shelf in the kitchen next to a bunch of other wine stuff. Made sense to me. ;)


I hope that tutorial was helpful! Happy Crafting!

Saturday, February 16, 2013

Hair Bows!

Two of my bridesmaids just had babies... So when I saw these cute little ribbon flowers at JoAnns the other day, I knew it was hair bow making time! Welcome to the World, Cadence Ruth and McKinley Kay! I couldn't be more excited to watch you grow! And spoil you with all things girly, of course!

Happy Crafting!

Tuesday, December 25, 2012

Photo Quilt

I FINALLY finished all of my Christmas gifts! Yes, I do realize it IS Christmas day. I've been busy, so present making was saved for the last minute... Literally. Above is the last one, a photo quilt for Daniel's grandmother. I think it turned out pretty well for my first quilt ever. Merry Christmas, you all!

Happy Crafting!

Saturday, September 15, 2012

Bridesmaid Gifts

I have been dying to post this, but wanted to wait until I could show the fiancé how I asked my girls... So here it is! I couldn't just simply ask my closest girlfriends to stand by me on my wedding day, I had to do something cutesy and crafty!

I bought cute bags and wooden hangers, black grosgrain ribbon, grabbed a Sharpie, and went to work. I wrote each girl's name in black Sharpie, then tied a bow. Easy. Simple. Cute!

The bags will be used to hold their shoes, jewelry, etc. The hangers for their bridesmaid dresses!

Happy Crafting!

Monday, August 6, 2012

New Neighbors


New neighbors just moved in next door to Daniel... My reaction? "Yes! An excuse to bake cookies!" Below is a little tag and bag of peanut butter cookies I made to welcome them to the neighborhood. (cookie recipe to follow)

Happy Crafting!

Wednesday, April 25, 2012

Birthday Tu-Tu

As I mentioned yesterday, it's my cousin's birthday. Meet Alex...


She's modeling the black Birthday Tu-Tu I made her for her birthday. She's required to wear it at least one night in Vegas. And if you look closely, she's wearing a Birthday Pin, too. (I could have made a pun joke there, but I didn't... now you know I was thinking it, though.)


I hope people buy her drinks! And wish her a happy birthday!

To make the tu-tu, I cut and tied elastic to Alex's waist/pant size. I then cut strips of black tool and tied each strip in a knot on the elastic. That's it! So quick and easy!

Happy crafting!

Friday, March 2, 2012

A Lot of Yummy

I'm not sure why this stamp says "a LITTLE yummy for your tummy" when we all know I'm not going to package just a little treat for anyone. I wanted to thank the wonderful teachers I work with, my student aides that do a lot of my grading, and the dedicated support staff that, well supports me by baking cookies... Below are the tags I created to adorn each bag of Peanut Butter and Chocolate Chip Oatmeal Cookies.


Happy baking! And happy crafting!

Saturday, February 11, 2012

My Birthday Giveaway!

In celebration of my birthday, I'm having a giveaway...

What You Can Win:
A Set of 10 Handmade Birthday Cards from Cards & Cardigans


A Digital Birthday Bulletin Board Set from Miss Kindergarten


A Hand-Sewn Apron from Sew Long Ago


How You Can Enter:
1. Follow My Blog: leave me a comment wishing me a happy birthday
2. Share a Cupcake Recipe: leave a comment with a link (I love Red Velvet)
3. Visit Miss Kindergarten's Store: leave me a comment sharing your favorite item

The Rules:
Three winners will be chosen at random from the comments posted below.
There are three ways to enter, a separate comment post should be made for each entry.
Entries must be made by February 12, 2012 at 12:00 (midnight).

Good Luck!

Sunday, February 5, 2012

Super Bowl

Football Cookies:
Almond-Sugar Cookies, White Buttercream Frosting, Chocolate Fondant, White Icing


Endzone Cupcakes:
Chocolate Cupcakes, Green Cream Cheese Frosting, White Icing, Goal Post Toothpicks


Football Cupcakes:
Chocolate Cupcakes, Chocolate Ganache, White Icing


Endzone Trays:
Football Field Patterned Printed on White Cardstock, Cut, Folded, Glued...
line with wax paper to hold chicken wings!


Enjoy the Super Bowl, Ya'll! Happy Crafting!

Wednesday, December 14, 2011

Hand Stamped Coasters

Lucky for me, all my closest girlfriends seem to make similar steps in life around the same time... This makes gift giving easy! So for Christmas gifts this year, I hand stamped coasters to match their new/remodeled homes.

Heather just bought a new home with her hubby, Alex.

Hadar just moved into an apartment with her boyfriend, Tom.

Kimberly just got married and moved in with her hubby, Adam.

Andrea is remodeling her kitchen in her home with her hubby, Matt.

Here's the tutorial I followed... And I learned the hard way that if you use water based ink they will fade after getting wet. This poses a problem if you'd like to actually use the coasters.

Happy crafting all!

Wednesday, September 7, 2011

Back to School

Back to School. Back to School. To Prove to Dad that I'm not a Fool. {Billy Madison, Anybody?} If you hadn't guessed, school starts this week and I'm getting ready by making more Student Stick Cans! This one is for Kimberly. She teaches Math.


Parents: enjoy your first days free from your children. Teachers: good luck on your first days back to work. Everyone: happy crafting!

Tuesday, September 6, 2011

BBQ Apron

As a thank you to the Warne-McGraws for all their work to plan and prep the food for Daniel's Navy Party, I found them a BBQ Tri-Tip Recipe. They love BBQ Tri-Tip. I typed up the recipe into a recipe card and stuck the card in a paper apron that fit perfectly on the jar of BBQ Baste Mixture I prepared. Thank You, Warne-McGraws!


Happy Crafting, Ya'll!

Sunday, September 4, 2011

Navy Party

Like I said in my previous Navy Party Post, the party was awesome! Below are pictures of the decorations and food...

Thank You Hadar, aka Miss Kindergarten, for helping me paint the way cute signs we used. And by help, I mean she totally did it all for me while I watched and pretended I was doing something.


And she helped me fix all the mistakes I made painting stripes on wooden trays. I really should not be allowed to paint. Anything. Ever. I used one tray to hold Margarita Supplies at the bar and the other to hold a Boat, Cocktail Napkins, and LifeSaver Mints.


The Navy Props that were used in all those fabulous pictures. Nicole, my amazingly awesome partner-in-crime, found Temporary Anchor and Heart Tattoos! I know. Way Cool... Ignore the Gorilla Tape. The backdrop was giving us quite a hard time!


Thank You Jan, aka Daniel's Mom, for taking all these fabulous pictures. I was so preoccupied that I forgot to take pictures of all the decorations! I know! Thank Goodness for Jan! Here's the table, from left to right.


Thank You Nicole for all the work you put into planning and prepping the food! She made four different types of Butter as a toppings bar for Grilled Corn on the Cob. YUM!


And my Dessert Table. Nothing but Cheesecakes and Forks.


Remember my Triple Chocolate Cheesecake? Mmm. One of my Favorites.


And another one of my favorites... Peanut Butter Chocolate Chip Cheesecake.


So happy that so many of Daniel's closest colleagues, family, and friends could join him in celebrating his Commission into the Navy. Happy Crafting!