Sunday, March 2, 2014

DIY Pencil Vase

I found this idea somewhere on Pinterest (as usual), and decided to make one for a colleague for her birthday...

1. Start with an emptied and cleaned can, and a box of about 30 unsharpened pencils. Use a hot glue gun to adhere one pencil at a time around the can. Note: mine ended up a little crooked, so if I were to do this again, I'd probably use a level and draw some lines on the can ahead of time to use as a guide.
 
2. Just keep gluing. Just keep gluing. (Finding Nemo, anyone?)

3. And viola! I added a black ribbon, filled the can with water, and arranged some flowers.

Happy Crafting!

Thursday, February 27, 2014

O-Fish-Ally

At school, we've been doing the secret pal thing. (Think secret Santa, but for extended time.) Well yesterday was the big reveal, and I wanted to give my secret pal (the one giving gifts to me) something to say thanks...
"You're o-fish-ally the best! I'm so glad we're in the same school!"

I found two separate ideas on Pinterest (obviously) and put them together. And I ate the rest of the Swedish Fish that didn't fit. Win: Win.

Happy Crafting!

Friday, February 14, 2014

Valentine's Day 2014

...because what's Valentine's Day without a mushy valentine card?!


Happy Valentine's Day and Happy Crafting!

Tuesday, January 7, 2014

Fleece Tie Blanket

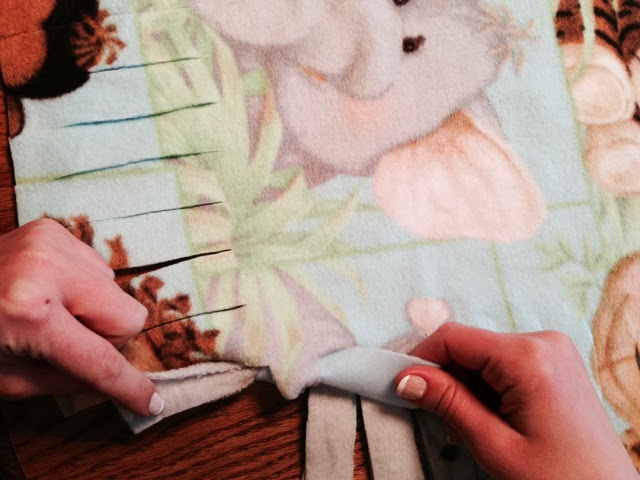
So we've all seen these... They're super easy, no-sew blankets... I FINALLY made one with the help from Jan, my soon-to-be-mother-in-law (STBMIL). She's been cutting and sewing up a storm, making 125 Days for Girls kits (whoa!), and getting much of the flannel donated. In the mix of all the flannel, there was some soft fleece, perfect for a baby blanket. So we decided to make that knotted blanket we've all seen so much...

We followed this tutorial on wikiHow.

1. Cut your top and bottom fleece to the same size.

2. Cut a 4" square from each corner.

3. Cut strips 1" wide and 4" long all the way around your fleece pieces.

4. Tie a knot (2 times to stay securely) with a strip from each layer (top and bottom).

5. Keep tying knots all the way around the blanket.

6. Snuggle up and enjoy!

A huge thanks to Jan for providing all the materials needed for this project, as well as taking the pictures! Such cute and snuggly fun!

Happy Crafting!

Sunday, December 1, 2013

It's a Mario Party!

I helped the fiancé of a friend of my fiancé's (whoa. did you follow that?!) throw a Mario themed birthday party... And it was so much fun! I made all the paper products (banner, labels), as well as the marshmallow pops. Of course, I bombarded my co-planner with ideas found on Pinterest. I clearly need children... But not yet. :)


The fiancé and I were Mario and Peach, and the birthday boy and his fiancé we Bowser and Peach. And that's the whole crew above... We're acting out our characters, if you didn't figure that out. ;)

Wahoo! Happy Crafting!

Monday, November 11, 2013

Wine Charms

Although our wedding is not until April, I couldn't wait to make these mr and mrs wine charms. Below is a tutorial.

1. Choose your font and print a stencil. I chose to use Carolyna Pro black, my most favoritest of favorite fonts ever. EVER. You could obviously choose a picture here, too.

2. Bend your wire as you trace your stencil. The thicker and sturdier your wire, the more difficult this will be. Use a pair of pliers to help. And don't forget to leave some length on one end for the part that goes around the wine glass (no idea what it's called).


3. Drink! Place your wine charms around your wine glass, pour yourself a drink, and enjoy!

Happy Crafting!

Paper Roses

Another long-time to do list item was finally checked off today. I've had the copies of music ready to use for almost 3 years now!!! Below is my step-by-step tutorial, which I found somewhere on the internet 3 years ago, printed out, and kept... So sorry I can't link to it, but I can't find it. :(

1. Gather some pretty paper. I decided to use some copied sheet music. I was in the teacher's lounge one day almost 3 years ago making copies when the music teacher walked in to do the same. The music he was copying looked "musicy" to me, so I asked if I could have one. Easy peasy.

2. Optional: Stain your sheet music. Pour some hot water into a 9" x 13" pan with a dark brown or black tea (I used a dark brown tea in order to get the soft creamy color, use black tea if you want something darker). Soak your sheet music in the tea for some time. Confession: I have no idea how long I left mine in there for. Maybe an hour or two? It could have been half a day, though. I was doing so many crafts at the same time!

3. Hang to dry. I tied up some string on my neighbor's house, then hung my sheet music using clothes pins. They only needed an hour or so to dry, but mine were in the sun and it's pretty dry out here.

4. Cut spiral flowers. I'm not sure how else to describe what to do here except, cut in a continuously smaller circle until you get to the the middle. I used my scalloped scissors, which created a pretty cool effect.

5. Wrap the spiral cirlcle flowers tightly around a pencil. When you do this, the spiral will naturally want to wind down the pencil. To avoid this, wrap tightly at the inside end of the spiral, keeping the bottom of your flower tight and allowing the top to become looser. This is how you will get a rose look, as opposed to just a tightly wrapped piece of paper. I also used hot glue every once and a while to help it all stay in place.

6. Glue stem. Glue one end of a green wire to the inside of the paper flower (where the pencil was). I created a little loop at the end in order to help the wire stay a little better.

7. Arrange. Cut the wire stems to your desired length and place your paper flowers in a vase. Viola! I put mine on a shelf next to all my Jane Austen books. Yes, I have read them all. And yes, they are all pretty much the same. ;)


Happy Crafting!

Wine Cork Monogram

I've had "make a wine cork monogram letter" on my to do list for quite a long time, so with a 3-day weekend, I finally decided to check it off!

Here is my step-by-step tutorial...

1. Arrange your corks. I chose to do a serif style letter and to randomly turn the corks each direction. You could also print out a font you like and arrange your corks on top. Or even buys wooden letter and glue your corks on top of that.

2. Glue. I used my hot glue gun to glue piece by piece. I found it helpful to line my corks up on the edge of the table (or the edge of anything straight) in order to keep them lined up right.


3. Decorate! I chose to place my wine cork monogram letter on a shelf in the kitchen next to a bunch of other wine stuff. Made sense to me. ;)


I hope that tutorial was helpful! Happy Crafting!

Saturday, November 2, 2013

Bugs and Kisses

I know. I've been MIA for pretty much ever. There's been A LOT going on at the Deslattington house, so I haven't had much time for anything crafty... A much needed update will be posted soon.

Today, our friend Melody celebrates her 1st birthday! D and I are driving down to San Diego for the big celebration, and I couldn't be more excited! Remember the obsession I have with baby clothes? Well my obsession with baby birthday parties runs just as deep. It's a serious problem. Because her party is themed "Magical Forest", I decided to go with a bug on her card... I didn't have much time to figure out a way to cut or stamp a beast, so bugs were the best I could do. ;)


Happy Crafting!

Sunday, May 12, 2013

Mother's Day!

When I think of Mother's Day, I think of flowers and bright springy colors. That's what inspired me in making this years Mother's Day card. I love a day that celebrates moms and all the wonderful things they do for their children: BIRTH, nurture, raise, teach, sacrifice, support, and mentor. Moms seem to always set the right example, at least mine always did! I hope today is a beautiful day for all mothers out there, new and not-so-new!  Happy Mother's Day!

Happy Crafting!

Thursday, March 14, 2013

Cell Cycle Foldable

Last foldable from my Student Project Display post... Below is the cell cycle foldable that students created while learning about mitosis. They really enjoyed this one. I think because it required a little less artistic work than the others, yet still left room for some decorative creativity (aka doodling).

Students were given a half sheet of paper with both the directions and a rubric, as well as 2 halves of a white 12" x 18" piece of construction paper, cut lengthwise. Then they went to work, doing their artsy magic. I've posted the direction and rubric handout here.


And that's it. Like I said, this foldable required less artistic work. Many students drew arrows between phases, created borders of chromosomes, etc. And it looks great displayed on a classroom wall!

Happy Crafting!

Tuesday, March 12, 2013

Cells Foldable

As I mentioned in my previous post, I have received several emails requesting templates for the foldables shown in my Student Project Display post. Most of those emails specifically request a template for the Cells Foldable shown below. Again, I don't have a template, but I can walk you through a tutorial of how to make the foldable. Remember, my students were AMAZING so they were able to create these images all on their own...

Students were given the following check list and grading rubric.

Step 1: Holding an 8 1/2" x 11" paper horizontally, fold both ends in so they meet, but do not overlap.

Step 2: Draw, color, and label the outside left flap as a plant cell and the outside right flap as an animal cell. OR use the following template pre-printed for students to color and label.


Step 3: With your paper flat (flaps open), you will have three sections formed by your folds. The far left section will be for plant cell differences, the far right section for animal cell differences, and the center for similarities between plant and animal cells. In each of these sections, cell organelles will be listed and defined.


And that's it! Easy peasy! Again, if your students are not AMAZING artists like mine were, just use the template included above.

Happy Crafting!

Monday, March 11, 2013

Organization of Life Foldable

So I've been getting a lot of emails lately, asking for the template used in the projects shown in my Student Project Display post. Unfortunately, I can't share a template because I didn't use a template. My students were just THAT amazing! I can, however, share a tutorial on how the project was done. I will be posting tutorials all this week...

For the Organization of Life Foldable

1. On an 8 1/2" x 11" piece of paper held vertically (any color or kind you want), make lines across at the following measurements: 1/2", 1 3/4", 3 1/2", 5 3/4", and 8". The spaces between each line will get larger and larger as you move down the page, just like the levels of organization in living things get larger and larger!

2. Fold the paper in half lengthwise (or vertically... or hot dog). Open it back up.
3. Cut from the left side of the paper along each line to the center point only. (Do NOT cut all the way across the page! Although, I guarantee you'll have at least one student that does this!) The left side of your paper now has flaps or tabs.
4. Refold the paper in half lengthwise (along your fold from step 2). And on the front, so the fold is on the left and the tabs open on the right, label each individual tab with the following: Organization of Life, Cells, Tissues, Organs, Organ Systems, Organism. Color, decorate, etc.


5. Open each tab of your foldable. On the left side (the back side of the tab) create a drawing to represent that level of organization. On the right side (the side that was not cut) define/describe each level and include at least one example. Color, decorate, etc.


And viola! Organization of Life Foldable!

P.S. If your students have poor measuring skills (like mine!) or you only have so much time to spend on this project (like me!), you can always create a template with step 1 above and make photocopies so that students can begin at step 2. It'll save some time.

Happy Crafting!